Weather is warming up here in New England, and our gardening is too! Since we’re doing so much with seeds and planting, I decided to add in a kindergarten math activity for my five year old. We set up this gardening STEM activity for the kids to try out. It’s a common elementary science experiment project, but kids love it every time!
A gardening STEM activity for kids


Gardening is the perfect match for charting and graphing lessons. Here’s a supply list for this project:
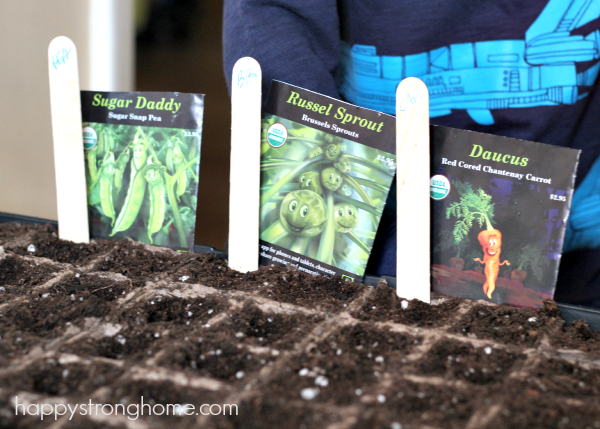
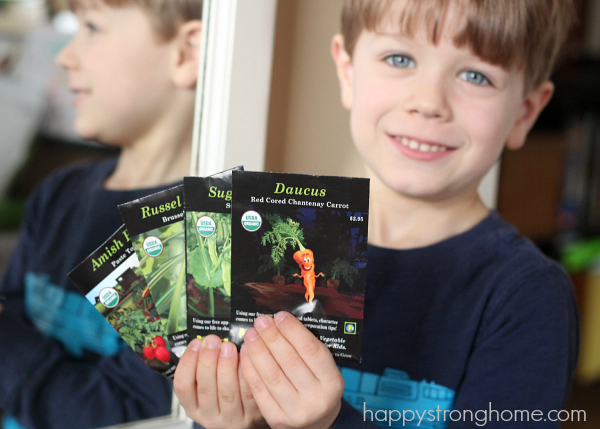
- 6-8 Seed Varieties
- Potting soil
- Containers or Seed Trays
- Tongue Depressors
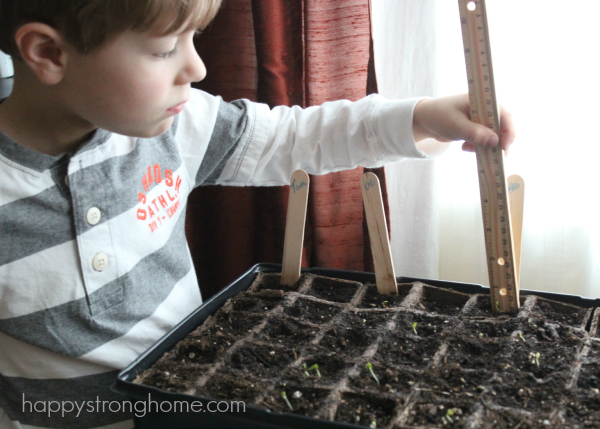
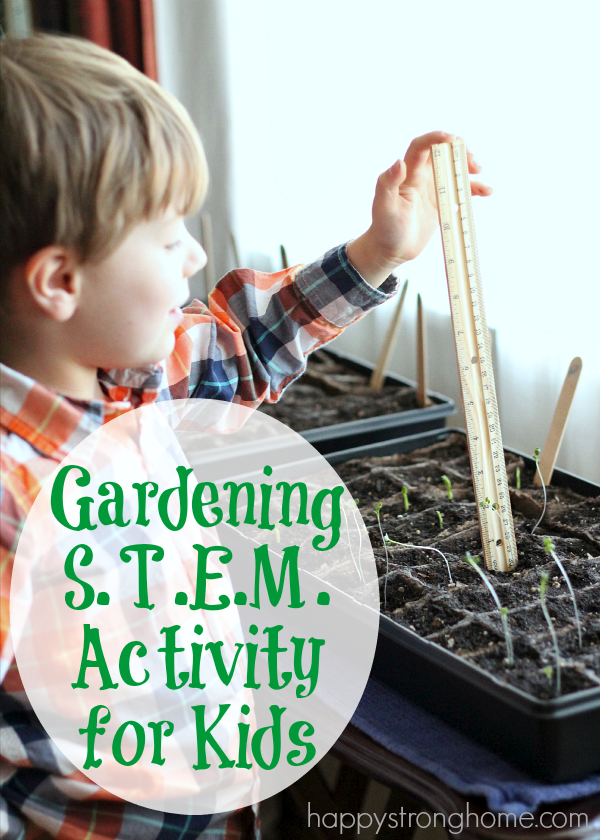
- Rulers
- Paper or cardstock for charting
- Colored pencils (or crayons, or markers)


Directions for setting up Powerful Plants:
- We took the seeds and planted rows of several varieties into potting soil. We like using seedling trays so we can bring them in and out while the weather is still finicky.
- Using the tongue depressors, we marked each variety so we’d be sure to know which was which!
- Create a chart and a graph for recording information. The chart will list the date and day (Number 1, 2, 3) in columns, plus have a column for each seed.
- For the graph, I taped a ruler to one edge of a piece of cardstock and drew one-inch rows across and columns down to form a grid(the 1″ rows is really important though – make sure to measure those out!). Each seed type we planted had a column (but then we planted more seeds and I doubled up!). I then photocopied a few times to have extras sheets (I have a two-year-old!).
Procedure for charting/graphing Powerful Plants:
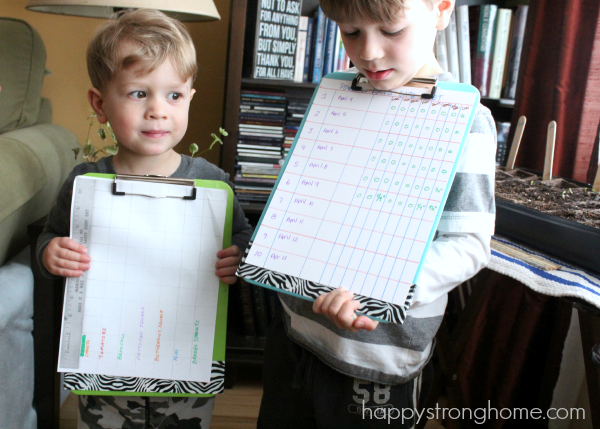


Each day, we checked out our seed trays and recorded data on our charts. (Really, use these terms with your little kids: data, record, chart, graph, measure. It’s great math foundation). For several days, there was no growth, so we recorded zero across the board on our charts. Finally, on day five, our Brussel Sprouts popped up!
We measured the height of the seedling and recorded it on our chart. Each day as more seedlings emerged, we measured each type and recorded their new daily height.
Also every day, on the graph, we displayed the seed growth using different colors to record the growth of each seed type each day. (The daily color code was also recorded on the chart).
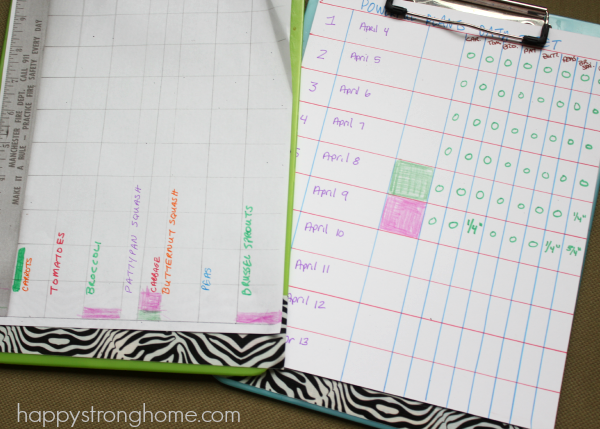

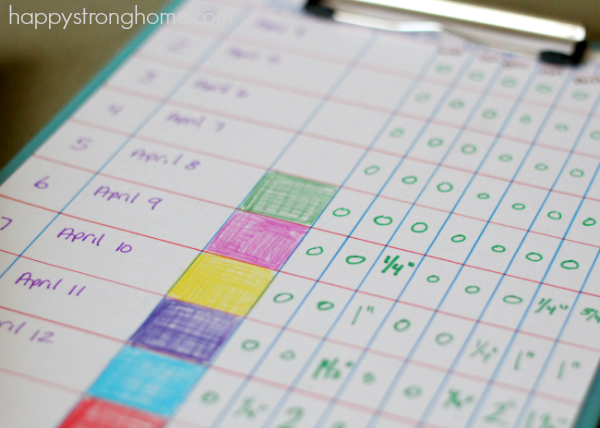

After ten days of recording data (the photos above show days 6 and 9), we took a look at our results!
Questions to accompany this STEM gardening lesson:
- Which seed(s) grew the tallest (most)?
- Which seed(s) grew the least?
- Which seed(s) took the longest to emerge?
- Which seeds grew about the same?
- Count how many seedlings emerged in the ten days.
- Count how many days till the first seedling appeared.
- Count how many days till the last seedling appeared.
- If using a ruler is new to your child, go over how to read inches (you may have to help out with the quarter inches, and we rounded up to the nearest quarter inch).
You could certainly continue charting and graphing for longer than ten days. We still are waiting for our carrots and pattypans to show up, so we are tracking them for a bit longer. However, ten days is enough for younger kids to see and record growth.
Charting and graphing plant growth gives kids a purpose to their seed planting and keeps them engaging in the growing process for a longer time.
My boys loved using the rulers to see how tall their plants grew each day! They can’t wait to get these seedlings into our prepared raised garden beds soon!


Wondering what to do next? Try this Plant Watering Lesson for kids to help them properly care for their growing plants!


25 Easy STEM Activities For Homeschoolers - SoCal Field Trips
Tuesday 8th of November 2016
[…] A Gardening STEM Activity for Kids – Happy Strong Home […]
Capturing Life Moments Using Timelines (Writing Workshop)
Friday 5th of June 2015
[…] Planting Seeds […]
Capturing Life Moments Using Timelines (Writing Workshop)
Friday 5th of June 2015
[…] Planting Seeds […]
Adelina Priddis
Thursday 16th of April 2015
I love gardening with the kids! This is a fantastic activity
Trisha W.
Thursday 16th of April 2015
I love that you are using the proper terminology. My SIL's boys learned a bunch of shape names at an early age because she new them and they were interested in learning more than circle, square, triangle, rectangle, diamond, and star. It was cute to hear 3 y.o. talking about a rhombus. =)