I hope you love your root vegetables because… it’s about to get squashy in here! That’s right, this year, instead of a summer CSA, our family decided to buy a Winter CSA share. Because why not shake things up a little, right? Well… let me tell you, after three months of pickups, I have learned a thing or two about how to prep and store your winter CSA share!

How to prep and store your winter CSA share
If your farm is anything like ours, your winter CSA might come in the form of monthly pickups instead of weekly. That’s because most of the veggies are “storage” veggies, or are greens grown in a greenhouse at this time of year, so you’re not going to get as much as from a summer share. Although, we end up with twenty-five-plus pounds of produce each pickup. Here’s a sampling of what we’ve received:
- Fingerling potatoes
- Sweet potatoes
- Turnips
- Beets
- Onions
- Leeks
- Pasnips
- Carrots
- Daikon Radish
- Radish
- Cabbage
- Brussel Sprouts
- Assorted Squash (butternut, sunshine, acorn, and other heirloom varieties)
- Kale
- Asian Mixed Greens
- Arugula
- Garlic
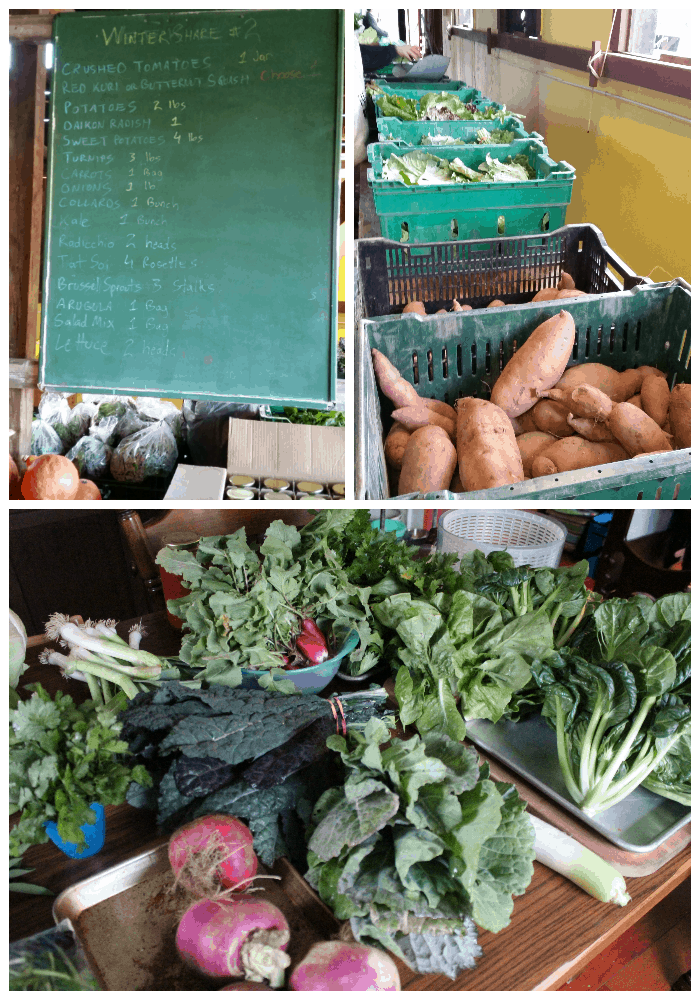
Here’s a picture of our actual farm share both at the farm pick up and on my kitchen table!

Prep and store your winter CSA – before you head to the farm:
- Clear your sink, counters, and tables
- Lay out cutting boards, colanders, knives and other tools. Cookie sheets make great holding spaces and can be used for quick roasting or drying foods.
- Fill up two large buckets with water for soaking/rinsing
- Clean out your fridge to make room
- Have food dryers, sealers, freezer bags and markers handy
Bring a cooler and reusable bags to the farm, because they often won’t have a lot of spare bags.
Prep and store your winter CSA – once you get home!
Once you’re home, here’s a few steps you can take to prep and store your food. Of course, this all depends on what varieties you get, but here’s how I process our load!
- Items that need no prep can go immediately into a cool, dark place.
- Potatoes go in a paper grocery bag with folded paper bags between each layer (this prevents one rotting potato to spoil the ones nearby)
- Squashes get lined up on a sheet of cardboard
- Onions go in a cardboard box
- Garlic goes in a paper bag away from the onions. Do not store onions, garlic, and potatoes near each other, they can make the other items start to ripen faster.
- Carrots are often dirty – when our pick up day is dry, I have our boys roll them in the grass to brush off dirt, otherwise I brush them with a potato scrubber. Same for the potatoes if they are really dirty.
- DO NOT WASH VEGGIES unless you plan to cook and serve them the same day!
- Turnips, beets, parsnips, and other small root veggies can go in plastic bags, loosely fastened, into the fridge.
- Cabbage can also be stored a long time in the fridge.
- Salad greens often need no prepping until right before eating, so they go right in the fridge
- Kale – unless I plan to make a soup, I wash and bake these into kale chips. Usually kale is not very dirty. A quick soak in one of my big buckets of water while I am putting away the other items does the trick. Remove hard spine from leaves, chop and spin dry in a salad spinner. Chop, then toss with oil and salt. Roast at 400 degrees and stir, checking often for doneness.
- Leeks – I chop the ends off and soak these in a cold water bath, gently stirring to loosen silty residue that gets between the fine sections. Letting it soak allows this sand to fall to the bottom leaving me only clean leaks. Then I dry, chop, and freeze the leeks in freezer bags for soups.
- Daikon Radish – you got me. I have tried making chips, but they always burn. I think I’ll try roasting in chunks next time.
- Other greens like Swiss Chard, Spinach, etc, I soak in the buckets, chop, spin dry and freeze by squashing them into the bottom of a plastic gallon bag, then rolling the bag up. When they are frozen into a roll like this, I can easily chop off a bunch for smoothies or soups.
- Brussel Sprouts will come on a long stalk. This gets bulky for storage so I snap all the sprouts off, remove any major blackened leaves (which is just frostbite), and store in a plastic bag in the fridge for up to 1 week.
Be prepared for a lot of dirt and sand on your counters, tables, and floor while you prep! But in the end, you should have a fridge, freezer, and pantry packed with fresh produce!
How many of you use a lot of winter vegetables or have a CSA membership? I am thinking of posting a round up of winter root vegetable recipes soon because I’m always finding great recipes to try !
Share your favorite root veggie recipe in the comments!


Dana Rodriguez
Friday 10th of March 2017
I have never heard of a CSA membership. This sounds like something I would like.
Dandi D
Thursday 23rd of February 2017
I've never heard of CSA before, but it sounds like a great thing to try!
Rosie
Monday 6th of February 2017
This is great information. I haven't tried a CSA yet, but I would love to, especially knowing how I can make things last! I've seen some ways to dry daikon radish in the dehydrator. (I have one but don't use it much, b/c it takes 1000 watts and needs to go several hours), but they look soo good and sound delish.